
Tired of dealing with the clutter of bulky cisterns that take up precious bathroom space? As a plumber, you’re constantly asked to deliver clean, functional installations that don’t compromise on style. Concealed cisterns are your solution.
In this article, we’ll arm you with everything you need to execute a flawless, efficient installation that will impress your clients and make your job easier.
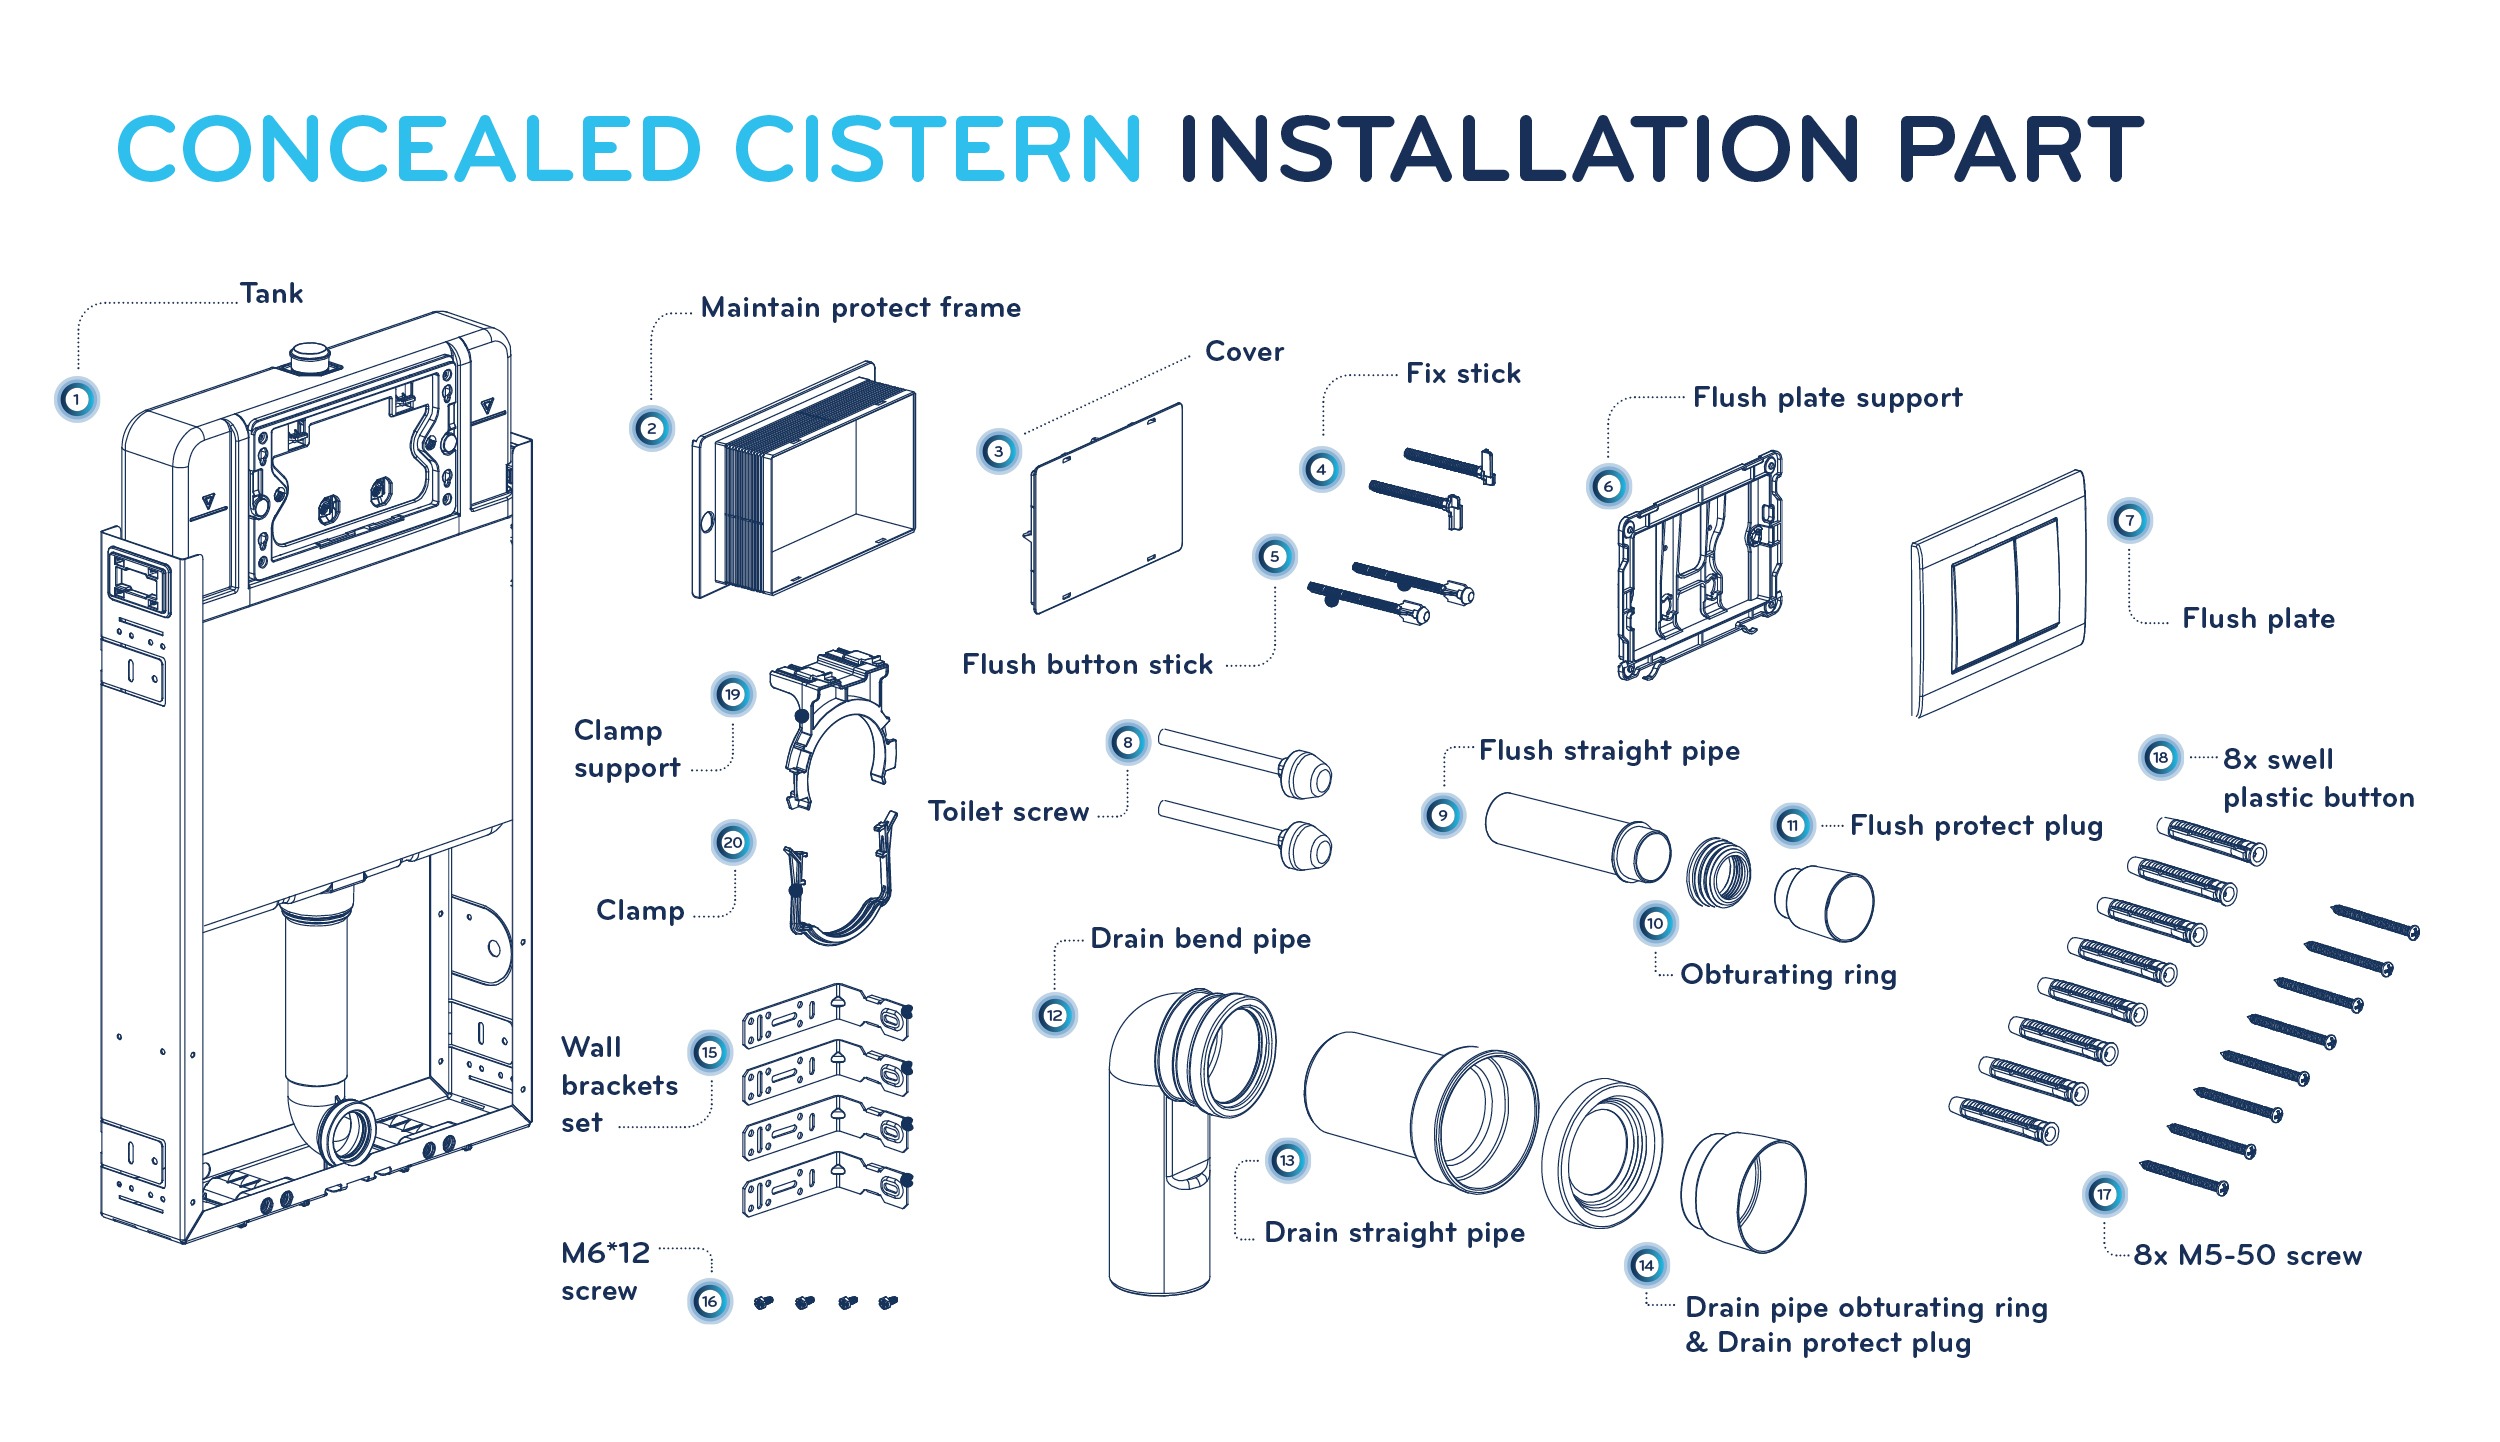
What You Need to Fit a Concealed Cistern
- Tank.
- Maintain Protect Frame.
- Cover.
- Flush Stick.
- Flush Plate Support.
- Flush Plate.
- Toilet Screw.
- Flush Straight Pipe.
- Obturating Ring.
- Drain Bend Pipe.
- Drain Straight Pipe.
- Drain Protect Plug.
- Wall Brackets Set.
- M6*12 Screw.
- M5*50 Screw
How to Fit a Concealed Cistern
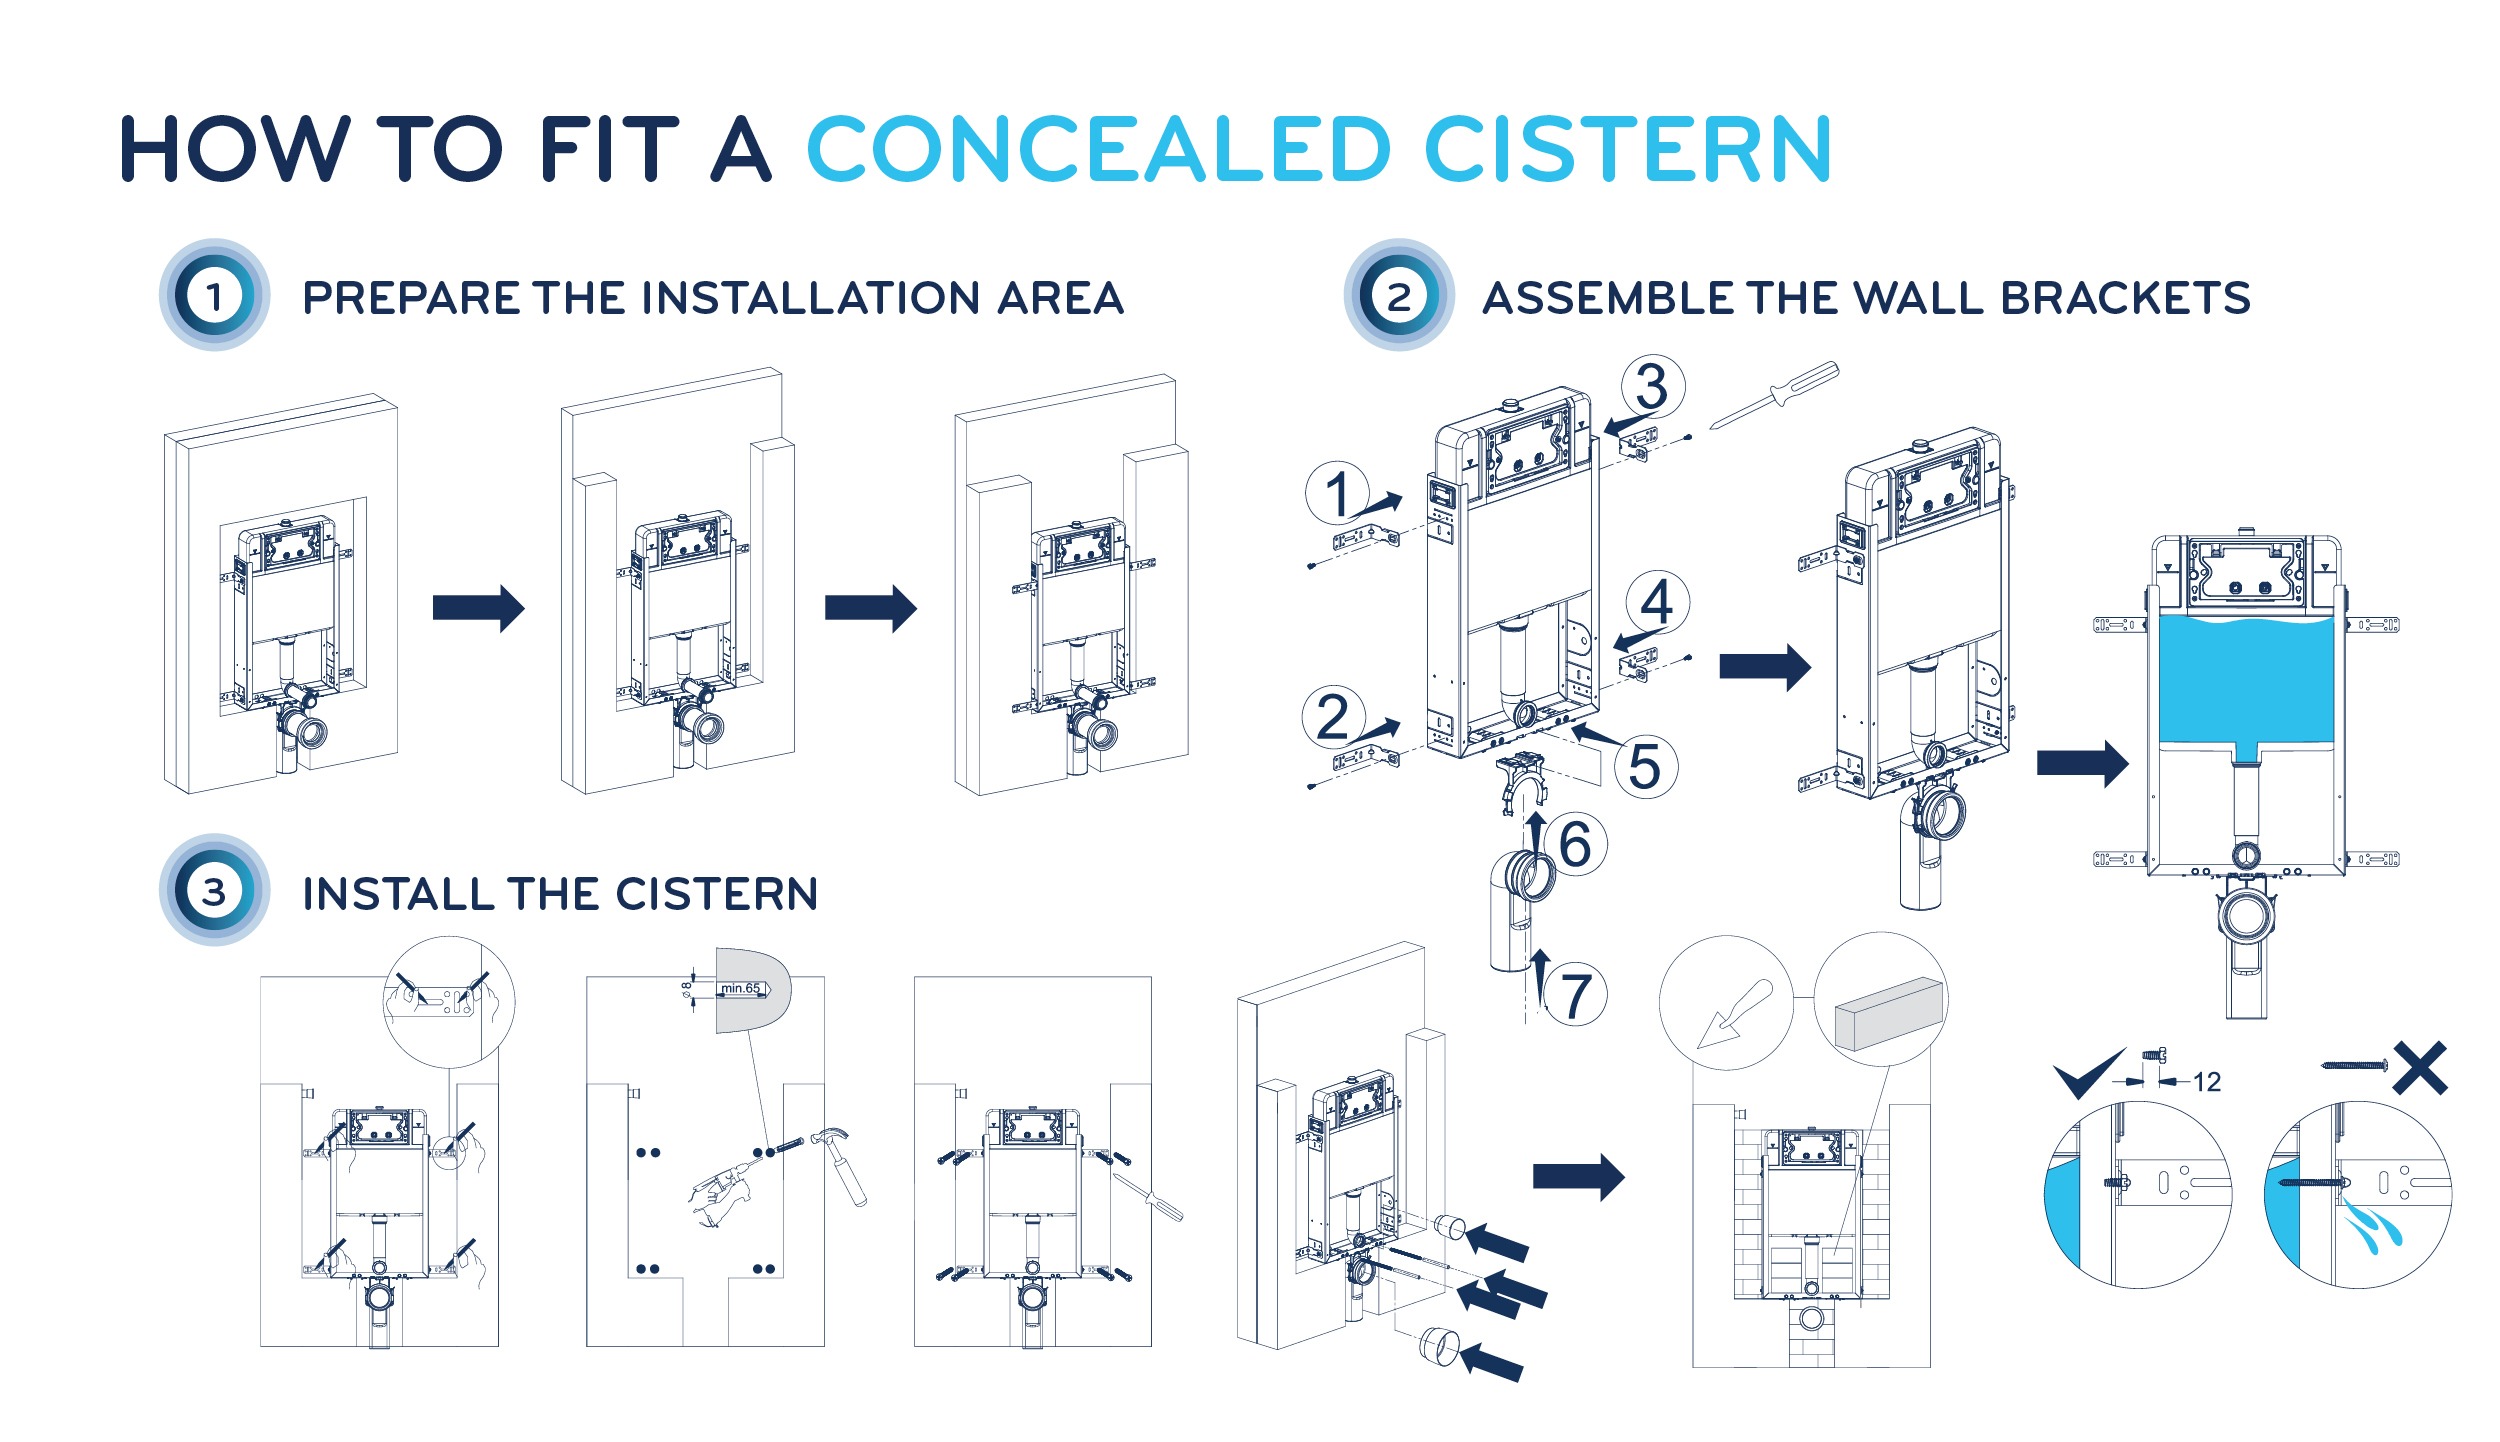
Step One: Prepare the Installation Area
If you’re installing the cistern on a false or half-false wall, make sure the wall is prepped for mounting. This means confirming the position of the frame, checking that the false wall is sturdy enough to support it, and ensuring the cistern will fit properly behind the wall.
Step Two: Assemble the Wall Brackets
Align the wall brackets with the designated slots on the metal frame. Make sure the brackets are securely attached, as they will support the cistern frame when mounted to the wall. Use a screwdriver to secure the brackets to the frame.
Attach the drain pipe to the metal frame using the correct fitting. Tighten all connections carefully; the bracket should be fixed in place and the pipe securely attached without any leaks. Make sure the drain pipe is facing the correct direction, as improper alignment can affect the cistern’s functionality.
Step Three: Install the Cistern
First, align the cistern with the wall and the marked installation area. Position it against the wall where you’ve prepped the mounting holes. Insert the screws through the designated holes in the cistern frame and into the wall brackets. Securely fasten the cistern to the wall. Tighten the screws evenly to distribute pressure across the frame and prevent any misalignment.
Once the cistern is mounted securely, double-check that everything is aligned and firmly fixed.
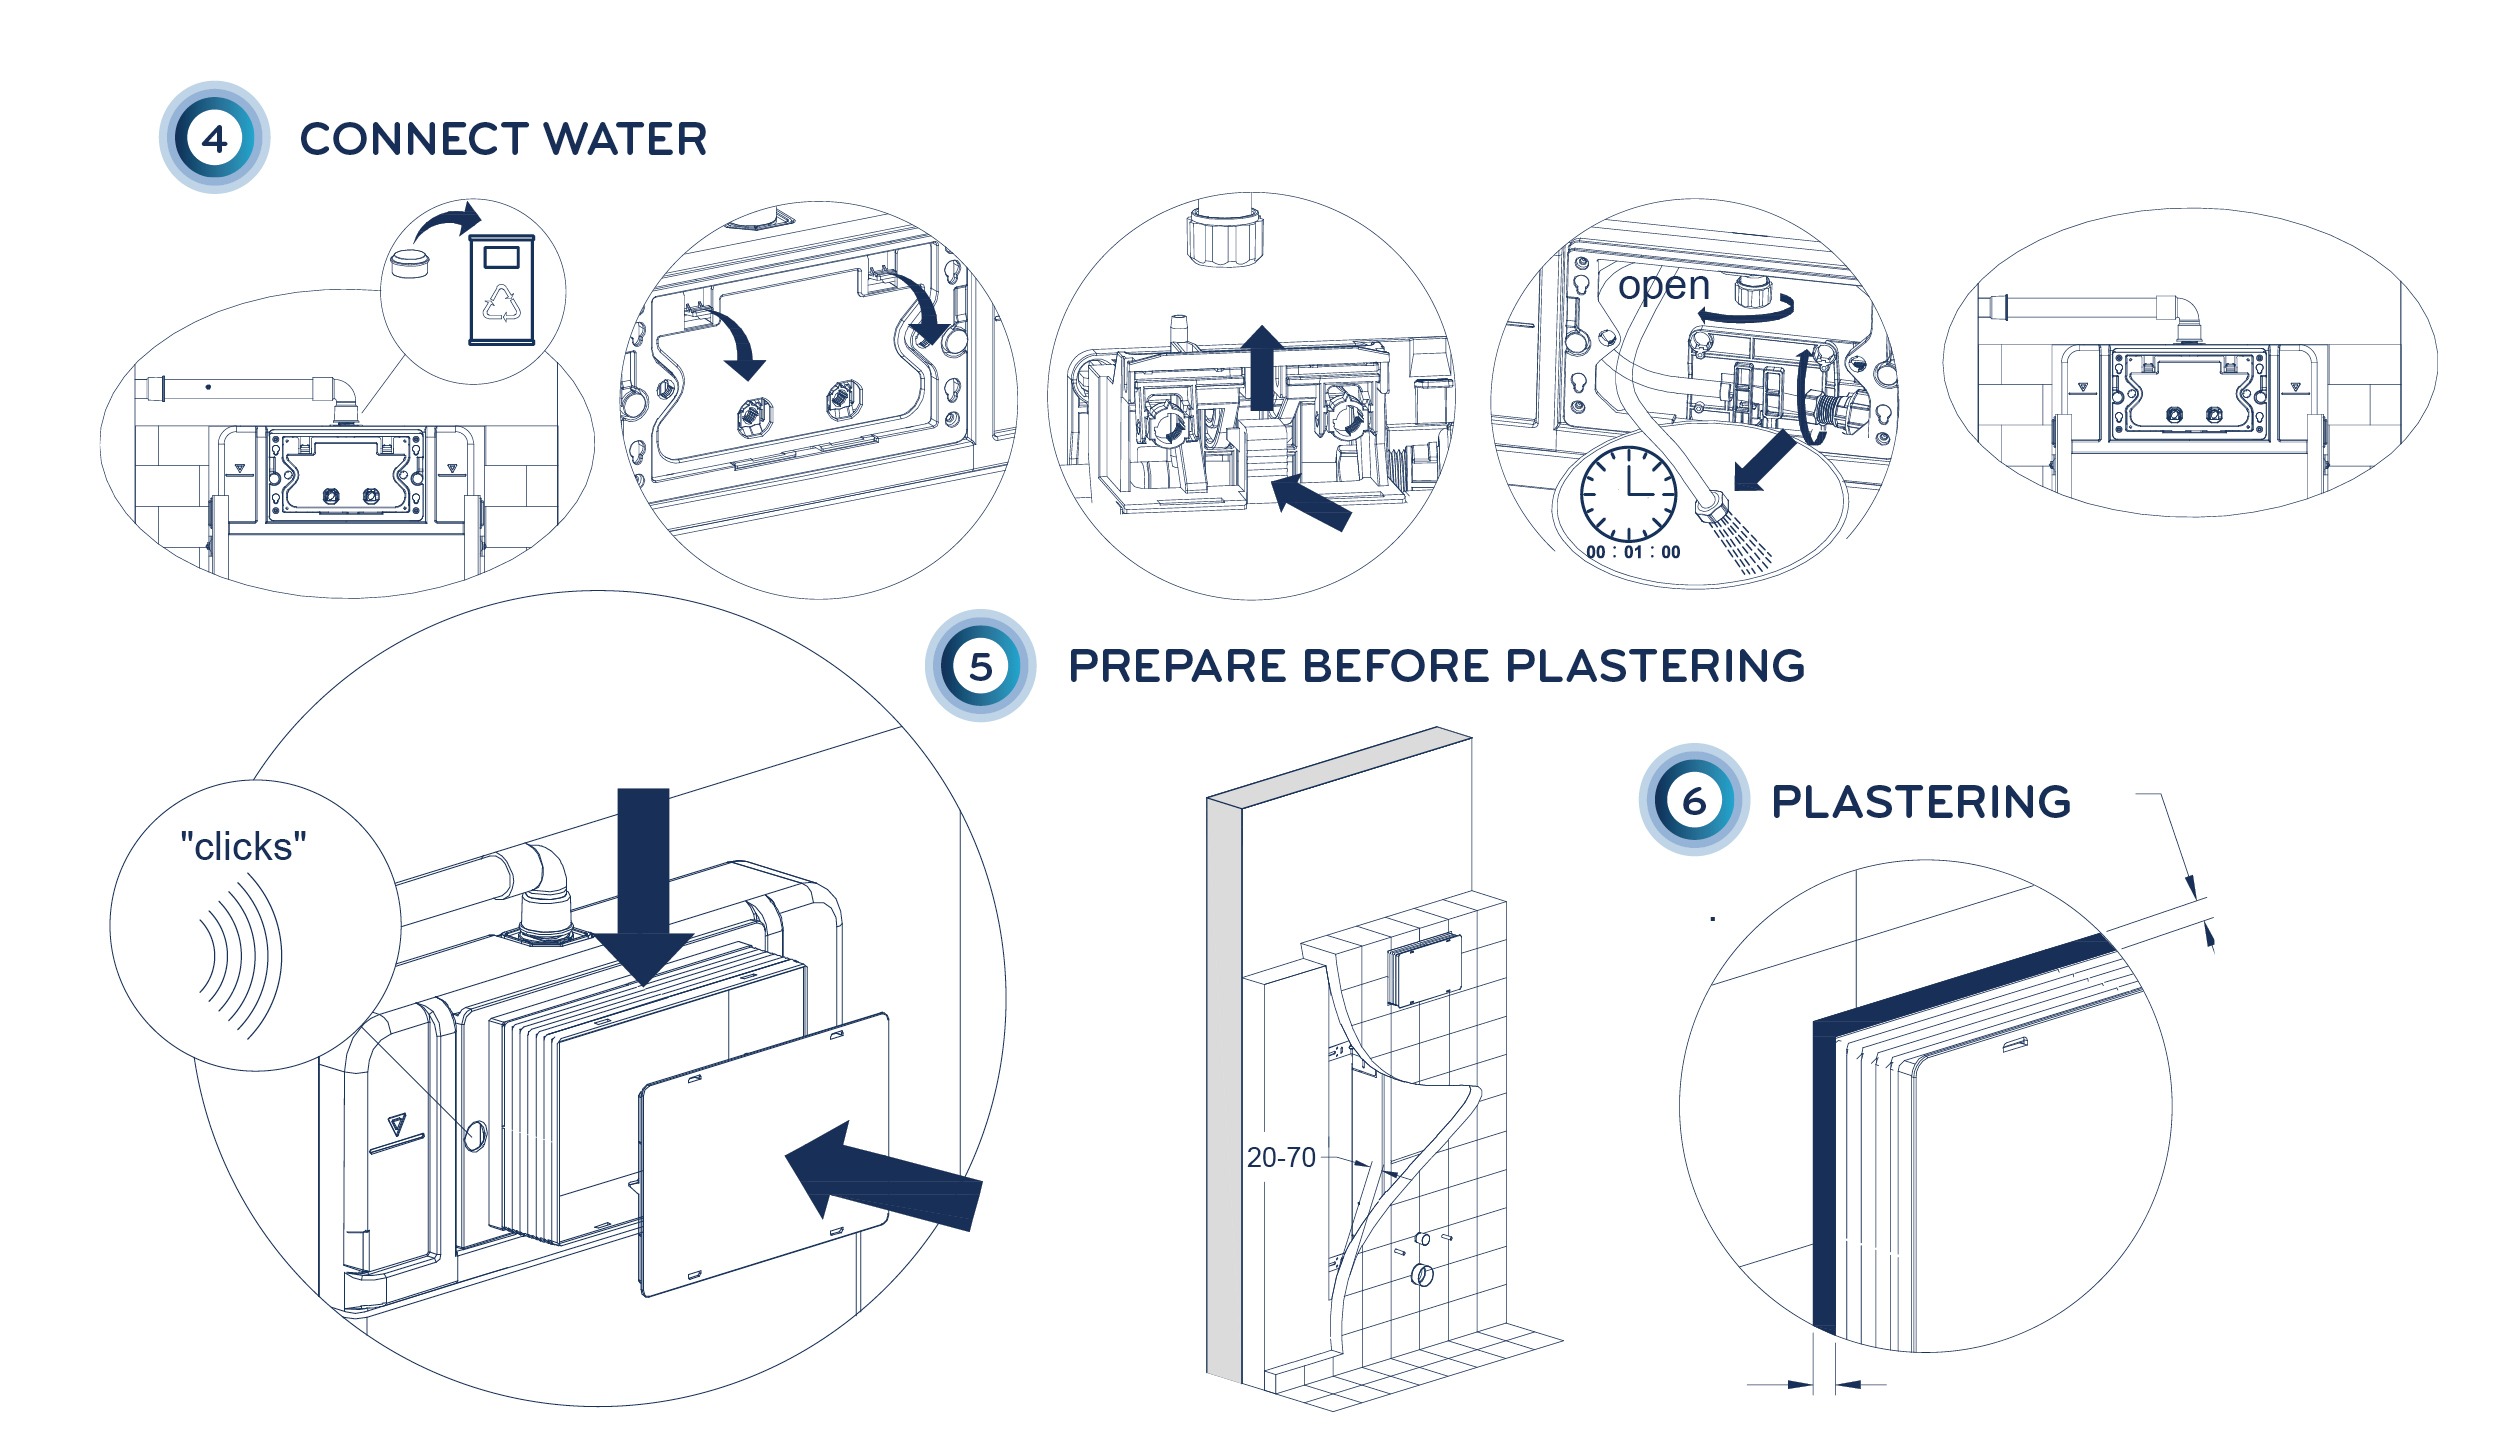
Step Four: Connect Water
Connect the water pipe to the cistern’s water inlet, making sure the connection is firm and secure to prevent leaks. Once the pipe is attached, remove the connector and drain any remaining debris or water from the system.
After cleaning, reinstall the connector back into its original position. Double-check for any leaks and make sure the water supply is functioning properly.
Step Five: Prepare Before Plastering
Before plastering, confirm that all components are securely in place. You should hear a click when the parts are properly aligned, signaling they’re ready for the next stage. Attach the protective cover; it must fit correctly.
Always check for any leaks before plastering to make sure the water connection is secure.
Step Six: Plaster
Now that everything is set, you can begin plastering. Apply plaster to the wall, ensuring that the gap between the tiles and the Maintain Protect Frame is no more than 5mm. This ensures a smooth, even surface for tiling. Keep the plaster thickness consistent – the frame should be properly covered, but without excessive buildup.
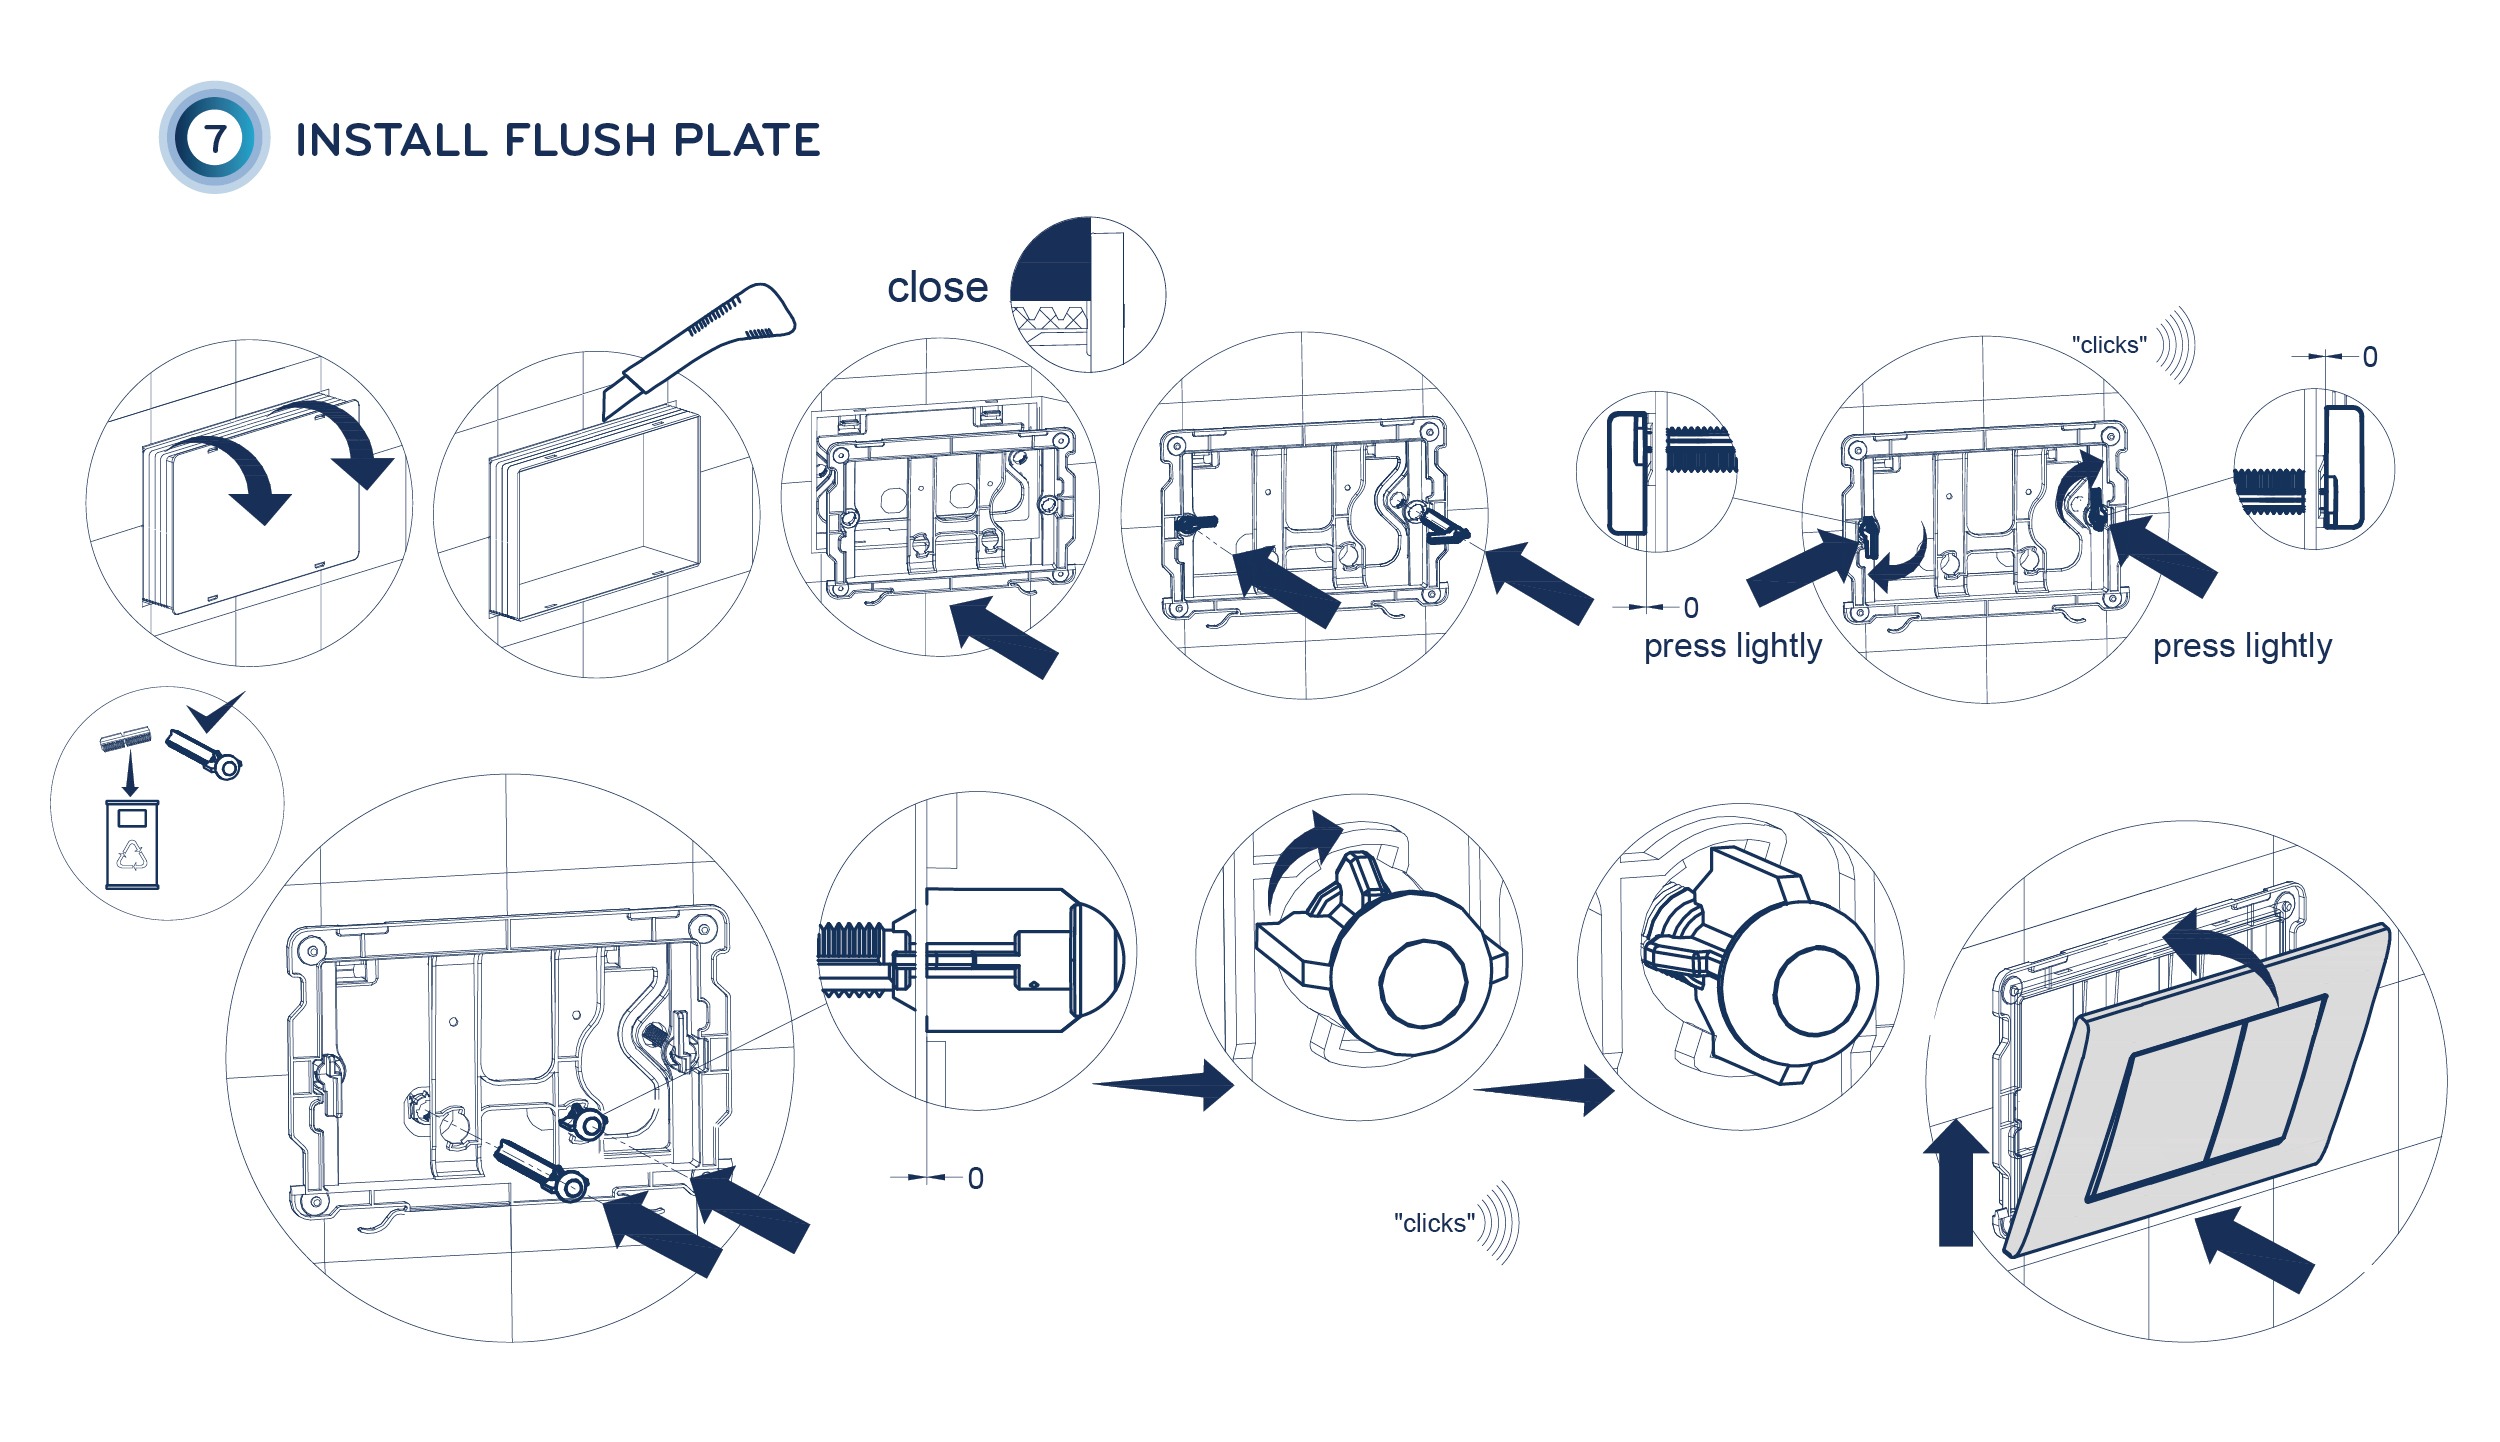
Step Seven: Install Flush Plate
To install the flush plate, start by aligning the plate with the mechanism and press it lightly into position.
- Attach the flush plate support to the frame, ensuring it fits securely.
- Gently close the flush plate cover, ensuring it’s aligned properly.
- Press the plate lightly to engage the mechanism. You should hear a “click” sound, indicating it is securely in place.
- Tighten the flush plate by inserting the provided screws and ensure the plate is properly attached and functioning. Once the flush plate is installed and secure, give it a final test to ensure smooth operation.
Step Eight: Install the Pan
Now, install the toilet pan securely over the cistern.
- Lubricate the rubber seals to ensure a smooth and tight fit.
- Attach the pan connector to the flush pipe. It must be aligned correctly.
- Attach the pan to the mounting brackets and check that it’s level.
- Secure the pan with the provided fixing bolts, making sure they’re tightly fastened.
- Use the cutting guide to trim any excess pipe.
- Ensure the cut-off pipe is chamfered to prevent any leaks or rough edges.
- Attach any remaining parts, ensuring everything is tightly secured and aligned.
- Once everything is in place, check the pan’s stability by gently pushing it. There shouldn’t be any movement.
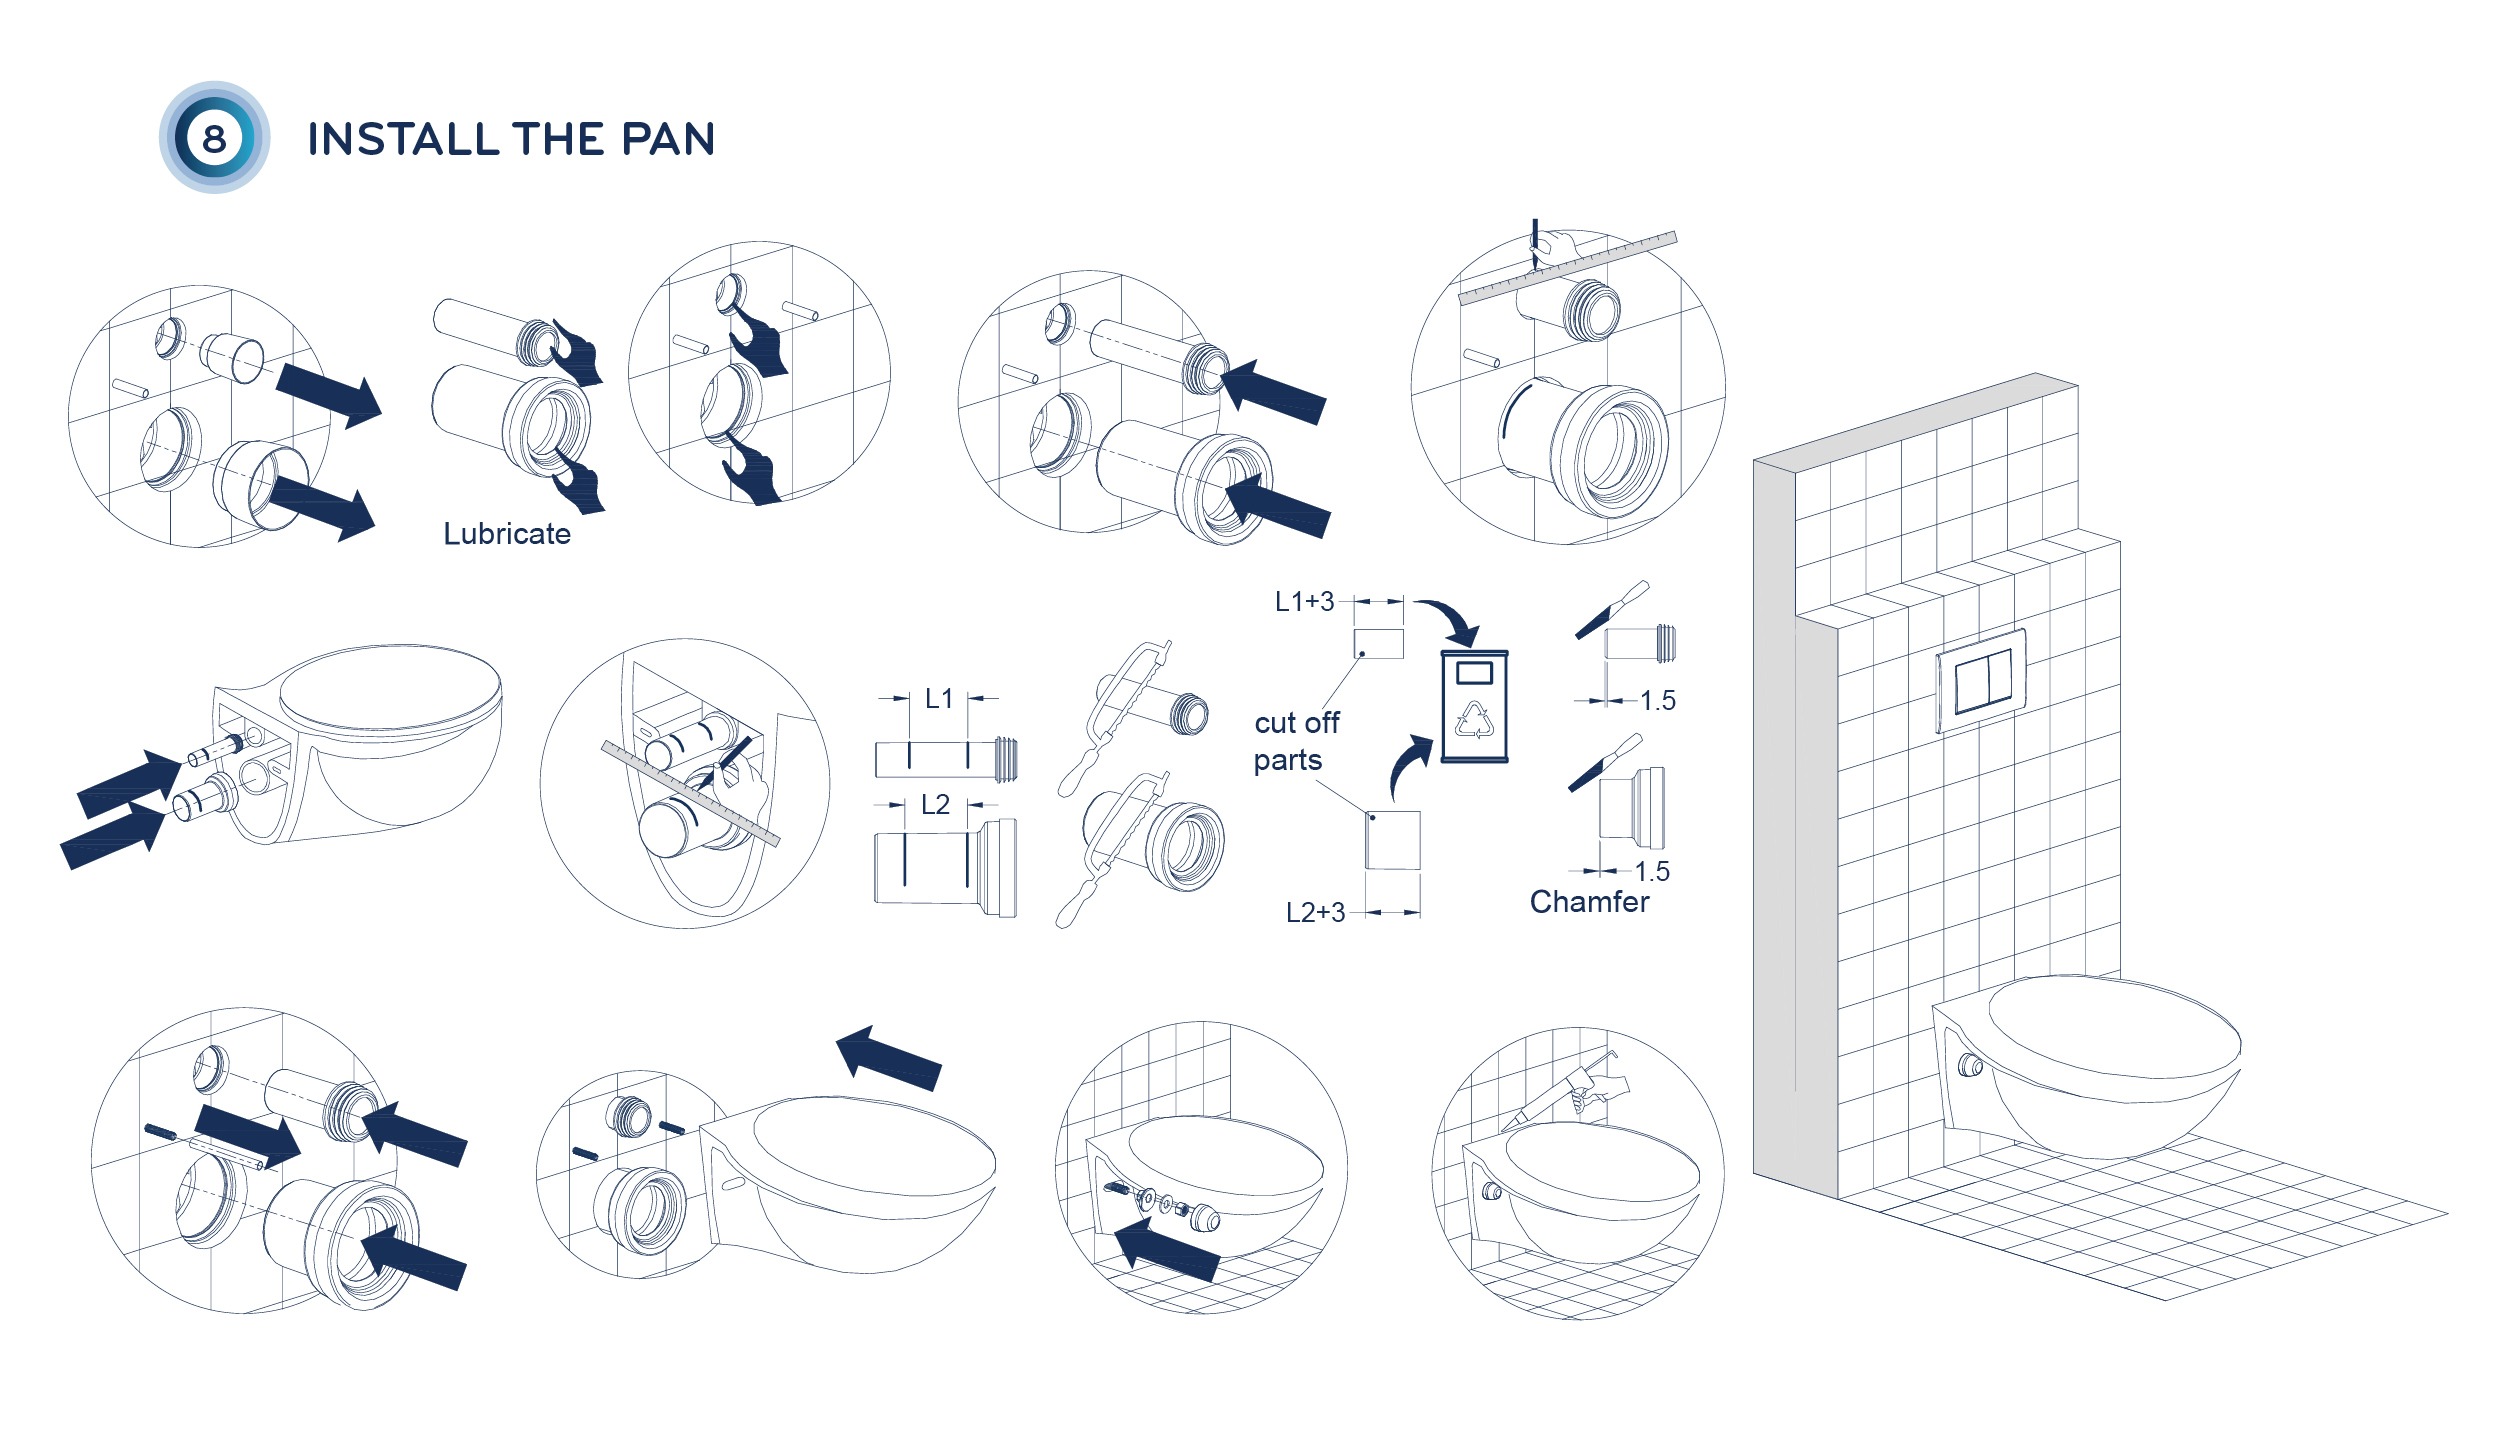
Now the toilet pan is securely installed, and the cistern setup is complete. Test everything for proper function and check for any leaks or issues.
Recommended: Design an image of all the steps above (only use the subheadings in the design, not the full paragraphs) with the alt text: “how to fit a concealed cistern”.
Concealed Cistern Installation Guide: Key Considerations
We recommend you install the concealed cistern before paving tiles in the bathroom. Confirm the installation location and the horizon after completing the project. Draw the horizon on the installation wall and set the installation height as the baseline for proper alignment.
FAQs on How to Fit a Concealed Cistern
Do you need a frame for a concealed cistern?
Yes, a frame is essential to support the cistern and connect it securely to the wall, ensuring stability and proper alignment.
How to install a wall-mounted cistern?
Mount the cistern frame to the wall, connect the plumbing, align the toilet pan, secure it in place, and attach the flush plate. Ensure everything is level and test the flush.
What are the disadvantages of a concealed cistern toilet?
Concealed cisterns can be more difficult to access for repairs and may require more complex installation.
How to hang a cistern?
Secure the cistern frame to the wall using appropriate fasteners. Make sure it’s level. Connect the plumbing, and mount the cistern mechanism. Finally, attach the flush plate and test the system.
How much depth do you need for a concealed cistern?
Typically, a minimum depth of 500mm is required to install a concealed cistern, but this can vary depending on the cistern model and installation requirements.
With the right steps, installing a concealed cistern is a breeze. Keep water pressure, alignment, and common issues in mind, and you’ll be set. Still unsure? Lecico’s cisterns are backed by a 10-year warranty for household use and a five-year warranty for commercial use on the installation frame and concealed cistern tank. Our mechanical flush/access plates and inlet and outlet valve products are covered for two years.
And, of course, our customer support team is always ready to assist. Please don’t hesitate to contact us.
Happy installing!

Fill out the form below, and one of our representatives will get back to you as soon as possible.


Our details


Be the First to Know: Get Exclusive Deals and Promotions from Lecico!
Sign up for our newsletter to receive exclusive offers, early access to new products, and special merchant discounts straight to your inbox. Don’t miss out on our latest deals to boost your product offerings and grow your business with Lecico!